Troubleshoot Seller Accounts
Learn how to troubleshoot and resolve API errors in seller accounts.
This topic describes how to troubleshoot a seller account when you encounter an API error. Using the following troubleshooting methods can help track down errors and lead to successful transmission of an API call between SP-API and Seller Central.
Selling Partner APIs provide error messages that help you trace errors. Both account issues and incorrect API calls can cause an error. In the following example, the 400 error response from the createFeed operation was caused by an inactive account issue.
{
  "errors": [
    {
      "code": "InvalidInput",
      "message": "Invalid request parameters",
      "details": ""
    }
  ]
}
| Error code | Cause | Steps to resolve |
|---|---|---|
| 400 | The response from the createFeed operation was caused by an inactive account issue. | The seller must check their account status in this marketplace. Note that the createFeedDocument operation doesn't return an error until the seller calls the createFeed operation. |
Troubleshooting an API error
When you receive an API error message, you’ll want to determine if it was caused by an account issue. Check the following conditions:
- Is there an issue with the request itself?
- Are all sellers having the same issue?
- Is the seller active in the designated marketplace?
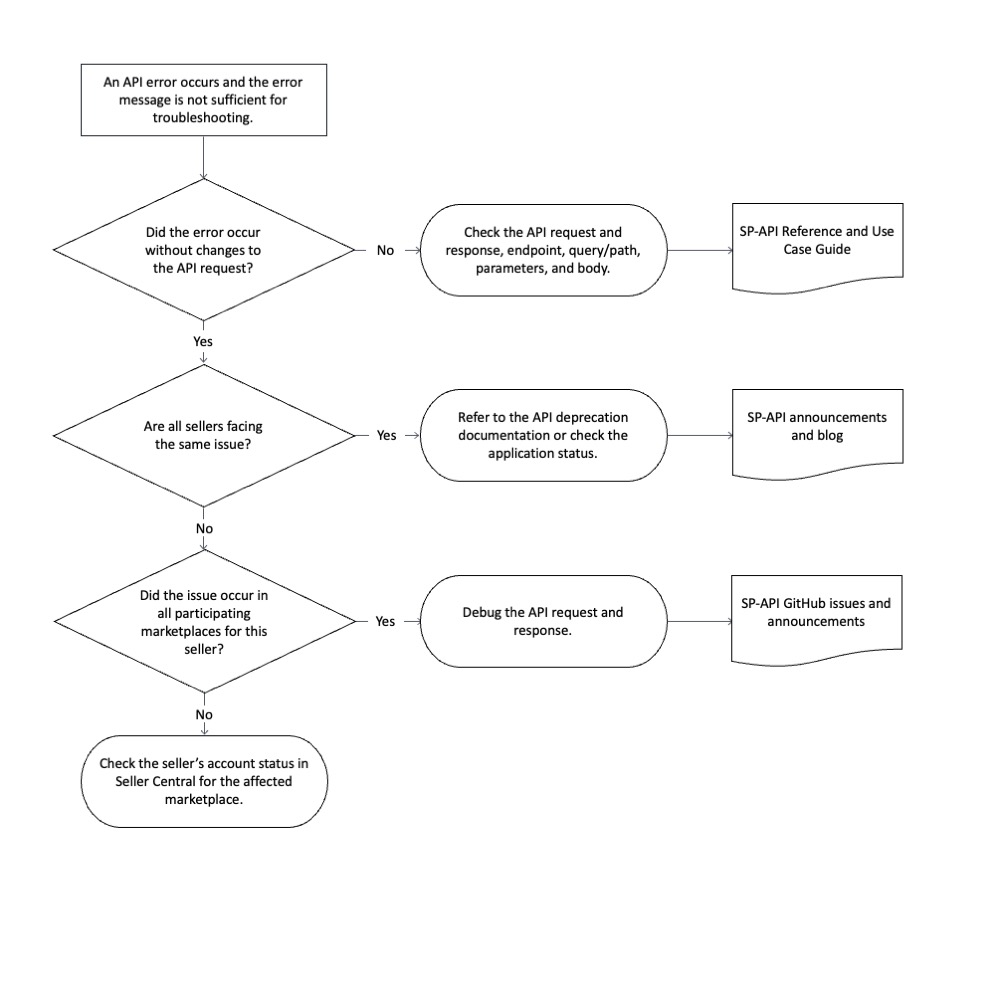
The following flow chart can help you determine the most suitable course of action.

Determining the cause of an API error
When you receive an API error, and the error message does not contain enough information to help detect the issue immediately, check the HTTP status code first. A status code of 200 means the API call was successful. If the status code is a 400 or 500 class, the API call has failed.
For example, the getOrders operation returns a 200 class, but the response is an empty list. In this case, the API call was successful.
To retrieve the correct API response, check the relevant request parameters. For example, check whether the date range specified in the query parameter is supposed to have no orders.
The 500 class reveals an internal server error indicating that the Amazon server failed to fulfill a request. However, for some specific APIs, such as the getListingOffersBatch operation, if the wrong URI parameter is present in the request body, the response is 500 instead of 400.
The following technical papers cover troubleshooting and optimization strategies related to 429 and 403 HTTP status codes:
If you still have an issue, check your roles and tokens.
Step 1: Check roles and tokens
After confirming the error, if the error code and messages don't provide solutions, check with the engineering team to determine if any recent code changes could have caused an API call failure. Check role and token parameters, especially when using a new API.
Roles
When checking role parameters, make sure an application has the correct role for the API call. For example, some analytical reports for brand owners (such as the GET_BRAND_ANALYTICS_ALTERNATE_PURCHASE_REPORT report, which is available in the NA, EU and FE regions) require the Brand Analytics role. Also, make sure the role is applied to both the developer profile and the application, or a 403 error can occur.
Access tokens
Next, check the access tokens. There are three major types of access tokens that are based on the type of API request.
-
The access token
The access token is the most commonly used access token for SP-API calls. If you include the
refreshTokenkey in the query parameter of theLWAoperation, then the access token appears in the response. -
Access token for grantless operations
The access token for grantless operations is only used for
grantless operations.Include the
scopeparameter in the query parameter of theLWA operation, specifying eitherSCOPE_NOTIFICATIONS_APIfor theNotificationsAPI orSCOPE_MIGRATION_APIfor theAuthorizationAPI. -
Restricted Data Token
A Restricted Data Token (RDT) is only used to fetch Personally identifiable information (PII), such as shipping address, buyer name, or tax-related information.
An RDT can only be retrieved via the
TokensAPI. For example, if a developer needs to retrieve shipping address information from thegetOrdersoperation response, the developer must first use the access token to request an RDT via theTokensAPI, and then use the RDT from the response as the access token to call thegetOrdersoperation.
When adopting a new API, the best practice is to use Postman and start with a simple API call with the minimal parameters. When possible, use only required parameters. Make sure the API call is successful, then add options one by one to avoid conflicting optional parameters.
After checking the roles and tokens, check the paths.
Step 2: Check paths
Checking paths allows you to distinguish whether an error originates from seller account issues.
To determine if sellers are receiving the same error, we recommend constantly logging the following for each HTTP request.
- Resource path
- Status code
- Error message
- Seller ID (merchant ID)
- Marketplace ID
By logging this information, you're creating records that can be reviewed at any time to help you identify issues with your account. This marketplace information is used in Step 3.
When an error occurs, check the API resource path to identify the API operation. Then, filter out the log for this resource path to determine how many sellers have an error status.
If a service is having backend issues, the error returns for all sellers. The error message is indicative of an account issue if only one seller, or a limited group of sellers, encounters it. If only some sellers are getting an error message, you'll need to do more debugging to find the issue. By comparing the number of occurrences of the same error, you can roughly determine whether the next troubleshooting step is to continue to Step 3 or to reach out to sellers.
Step 3: Determining the affected marketplace
The final step is to check which marketplace the seller participates in, for the account causing the error.
API call failures can come from sellers providing you with incorrect account information. To avoid this, use the getMarketplaceParticipations operation to determine which marketplaces a seller is participating in.
If any of the following responses occur, please double-check with the seller regarding their account in this marketplace, or ask them to re-authorize:
- A
403Unauthorizederror - The expected marketplace is not included in the response
- The value of the
isParticipatingfield in this marketplace isfalse
Sample response for the Far East (FE) region:
{
    "payload": [
        {
            "marketplace": {
               "id": "A1VC38T7YXB528",
               "countryCode": "JP",
               "name": "Amazon.co.jp",
               "defaultCurrencyCode": "JPY",
               "defaultLanguageCode": "ja_JP",
               "domainName": "www.amazon.jp (http://www.amazon.jp/)“
            },
            "participation": {
               "isParticipating": true,
               "hasSuspendedListings": false
            }
        },
        {
            "marketplace": {
               "id": "A1VN0HAN483KP2",
               "countryCode": "JP",
               "name": "Non-Amazon",
               "defaultCurrencyCode": "JPY",
               "defaultLanguageCode": "ja_JP",
               "domainName": "jp-shipment-injection.stores.amazon.co.jp"
            },
            "participation": {
               "isParticipating": true,
               "hasSuspendedListings": false
            }
        }
    ]
}
You can check whether the API is available for the marketplace, especially for Reports API, Feeds API and Notifications API operations, because not all resource paths are available for every marketplace.
To determine which marketplace an API supports, refer to the Feeds Type, Reports Type and the Notification Type documentation.
One way to help prevent account issues is to set up APIs to help you monitor account.
Using APIs to prevent account issues
Knowing whether a seller has an account issue before making the API call is helpful in preventing unnecessary API errors. There are two APIs you can request to monitor an account’s status.
-
ACCOUNT_STATUS_CHANGEDnotification
A notification is sent whenever the account status changes for seller/marketplace pairs. By implementing this notification type, developers receive a notification whenever the merchant's account status changes betweenNORMAL,AT_RISK, orDEACTIVATED. Go to Seller Account Information from Seller Central if notified that thecurrentAccountStatusis notNORMAL. -
GET_V2_SELLER_PERFORMANCE_REPORTreport
This report type contains individual performance metrics data from the Seller Central Account Health dashboard. We provide a response similar to the following example. However, you must not rely on this format.
{
   "accountStatuses":[
      {
         "marketplaceId":"A1VC38T7YXB528",
         "status":"NORMAL"
      }
   ],
   "performanceMetrics":[
      {
         "lateShipmentRate":{},
         "invoiceDefectRate":{},
         "orderDefectRate":{
            "afn":{},
            "mfn":{}
         },
         "onTimeDeliveryRate":{},
         "validTrackingRate":{},
         "preFulfillmentCancellationRate":{},
         "warningStates":[],
         "accountHealthRating":{},
         "listingPolicyViolations":{},
         "productAuthenticityCustomerComplaints":{},
         "productConditionCustomerComplaints":{},
         "productSafetyCustomerComplaints":{},
         "receivedIntellectualPropertyComplaints":{},
         "restrictedProductPolicyViolations":{},
         "suspectedIntellectualPropertyViolations":{},
         "foodAndProductSafetyIssues":{},
         "customerProductReviewsPolicyViolations":{},
         "otherPolicyViolations":{},
         "documentRequests":{},
         "marketplaceId":"A1VC38T7YXB528"
      }
   ]
}
Periodically call the GET_V2_SELLER_PERFORMANCE_REPORT and check the first level of the performanceMetrics object. It includes account metrics and each metric contains status information.
If any metrics are not in GOOD status, check the seller’s account status in Seller Central for further information. Refer to the Reports API Use Case Guide for more information on adopting this API.
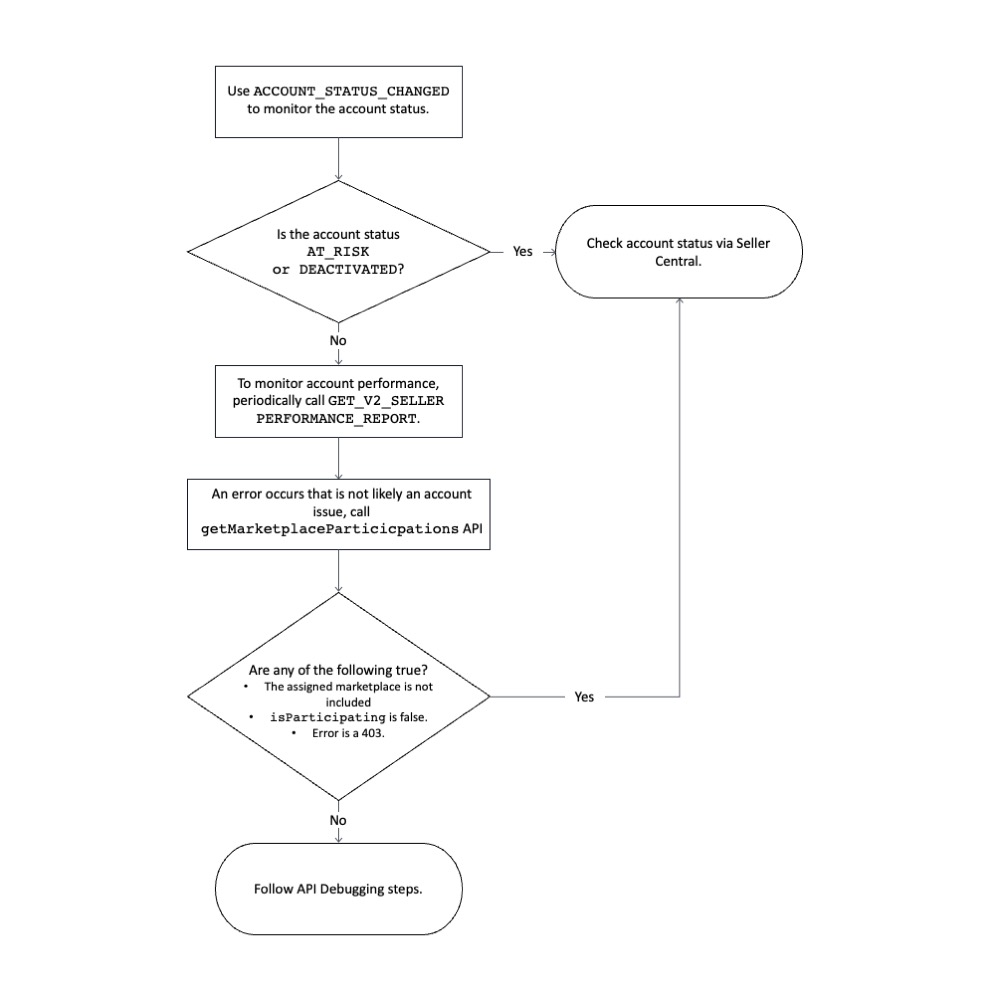
By combining the ACCOUNT_STATUS_CHANGED and GET_V2_SELLER_PERFORMANCE_REPORT APIs with the Sellers API, you can determine which marketplaces the seller participated in, whether the account is active in this marketplace, and whether there are any indications of poor account performance.
The following flowchart outlines the best practice for system design in relation to preventing account issues.

Updated 11 days ago
