Tutorial: Authorize Multiple Vendor Central Accounts with a Single SP-API Application
Use the self-authorization page in Vendor Central to authorize multiple vendor groups or Vendor Central accounts to a single application.
When you authorize multiple vendor groups to a single application, you avoid the need to create identical applications for each individual vendor group for authorization.
Vendor Central self-authorization
Vendor Central applications are created for a particular vendor group ID that is tied to the developer account. When you create a private application for your own organization, you can self-authorize and generate a refresh token to access SP-API for that account and all Vendor Central accounts that you have access to.
As a developer, you can create authorization grants and generate refresh tokens to a single application for each of your Vendor Central accounts. This reduces the need to create developer profiles and multiple identical applications for each individual vendor group/Vendor Central account for authorization.
You can authenticate with another set of credentials while remaining logged into your Vendor Central account. When you are logged in, you can create an authorization grant for any Vendor Central account to which the logged-in user has access.
Tip
Here are the Vendor Central URLs by marketplace.
Tutorial
Set up authorization grants and generate a refresh token between your applications and any vendor group or the Vendor Central account to which you have administrative access.
Prerequisites
To complete this tutorial, you need:
- To register as a developer on Vendor Central
- A private SP-API Vendor Central application in draft status
- A Vendor Central account that is an administrator of other Vendor Central accounts
Self-authorize your application in Vendor Central
The first step in this process is to self-authorize your application.
-
Sign in to Vendor Central with the credentials you used to register as a developer.
-
On the Integration menu, choose API Integration.
-
On the Developer Central page, for the application that you want to authorize, choose the Edit App drop-down menu, and then choose Authorize.

-
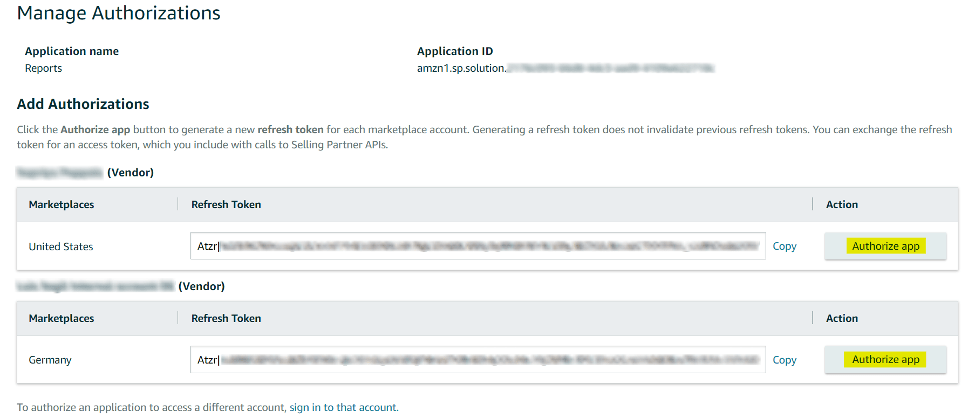
On the Manage Authorizations page, in the Action column, choose Authorize app for each Vendor Central account that you want your application to access.

A Login with Amazon (LWA) refresh token is generated for each application. A new refresh token generates each time you choose Authorize app. Generating a new refresh token does not invalidate your previously generated refresh tokens.
For ease of reference, you can store your existing LWA credentials securely in an encrypted location for each Vendor Central account that you authorized your application to access. You can use these refresh tokens to get access tokens for calling Selling Partner APIs. When you call a Selling Partner API to access a selling partner account, include the access token that corresponds to that account. For more information, refer to Connecting to the Selling Partner API.
If you don’t have your desired vendor groups/accounts, follow the steps in the next section to authorize your application to access a different Vendor Central account.
Authorize your application to access a different Vendor Central account
-
On the Manage Authorizations page, scroll to the bottom and choose sign in to that account.

-
Sign in to Vendor Central using the credentials for the Vendor Central account that you want your application to access.
-
On the Manage Authorizations page, choose Authorize app to get a refresh token. You can use these refresh tokens to get access tokens for calling Selling Partner APIs. For more information, refer to Connecting to the Selling Partner API.
Remove authorizations from your application
There is a maximum limit of 10 self-authorizations for generating refresh tokens at the application level. When your application has reached the limit of 10 self-authorizations, you must either remove an existing self-authorization or contact Vendor Central Support to increase your quota.
-
Sign in to Vendor Central with the credentials you used to register as a developer.
-
On the Integration menu, choose API Integration.
-
On the Developer Central page, for the application that you want to remove authorizations, choose the Edit App drop-down menu, and then choose Authorize.
-
On the Manage Authorizations page, in the Revoke Authorization section, expand Self-Authorizations to view all active self-authorizations.
-
For any authorization that you want to remove, choose Revoke.

For more information about this process, refer to Self authorization. For any issues or inquiries, contact Vendor Central Support.
Updated 11 months ago