List your app in Amazon Business App Center
Overview
This document provides you, as an Amazon Business developer, a step-by-step guide on how to list your application (app) in the Amazon Business App Center. Listing your app makes it publicly available on the App Center. This provides an opportunity for Amazon Business customers to find your app.
Prerequisites
Before you proceed, check if you have:
- a Solution Provider Portal (SPP) account
- created a production app client with an Amazon Business role in SPP
- provided valid OAuth Login and OAuth Redirect URIs in your production app client
If you answer yes to all, skip this section. Go to Sign in to SPP or Create AB App Center Listing.
No SPP account, yet? Refer to Submit your Developer Profile Request for instructions. Select at least one Amazon Business API role when you create your developer profile. This allows you to create an app client listing with Amazon Business App Center.
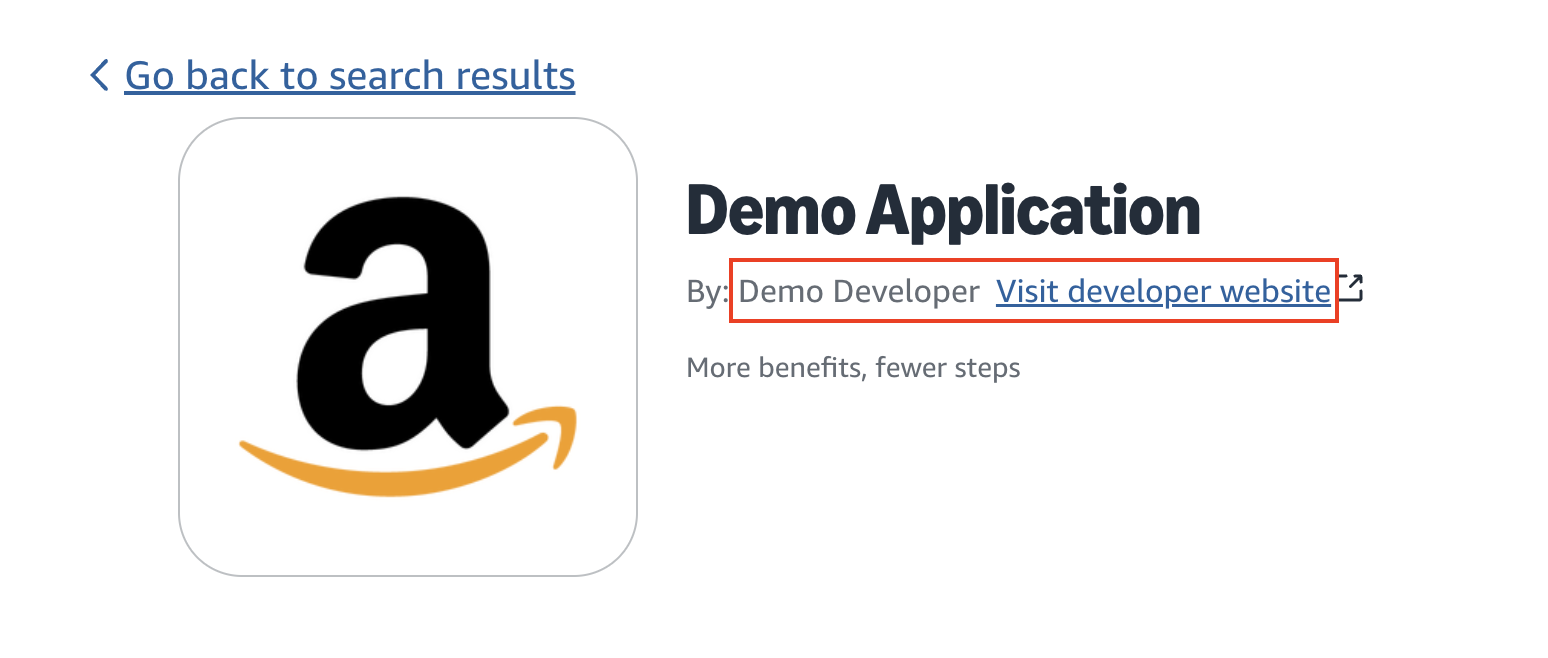
The following fields from the Developer Profile form populate on the app listing detail page:
- Organization name: Maps to “By [organization name]” on the listing.
- Organization website: Maps to “Visit developer website” URL on the listing.
For more information on the developer profile, see Submit your developer profile request .
If you have an SPP account, but no app created, refer to Create App Client in Solution Provider Portal for setup instructions. Valid OAuth Login and Redirect URIs must be provided in your app client before initiating the app listing process. The redirect URI is used to send the OAuth code to enable API authorization, and the login URI is used to define the landing page that the user is directed to after selecting “Connect app.” Without defining OAuth Login and Redirect URIs, customers will be unable to connect to your app.
Important!
Once you list an app in production, do not change your OAuth Login or Redirect URIs. Reach out to your Amazon Business contact for more information.
Sign in to SPP
- Sign in to SPP using your Amazon Business account credentials. SPP displays.
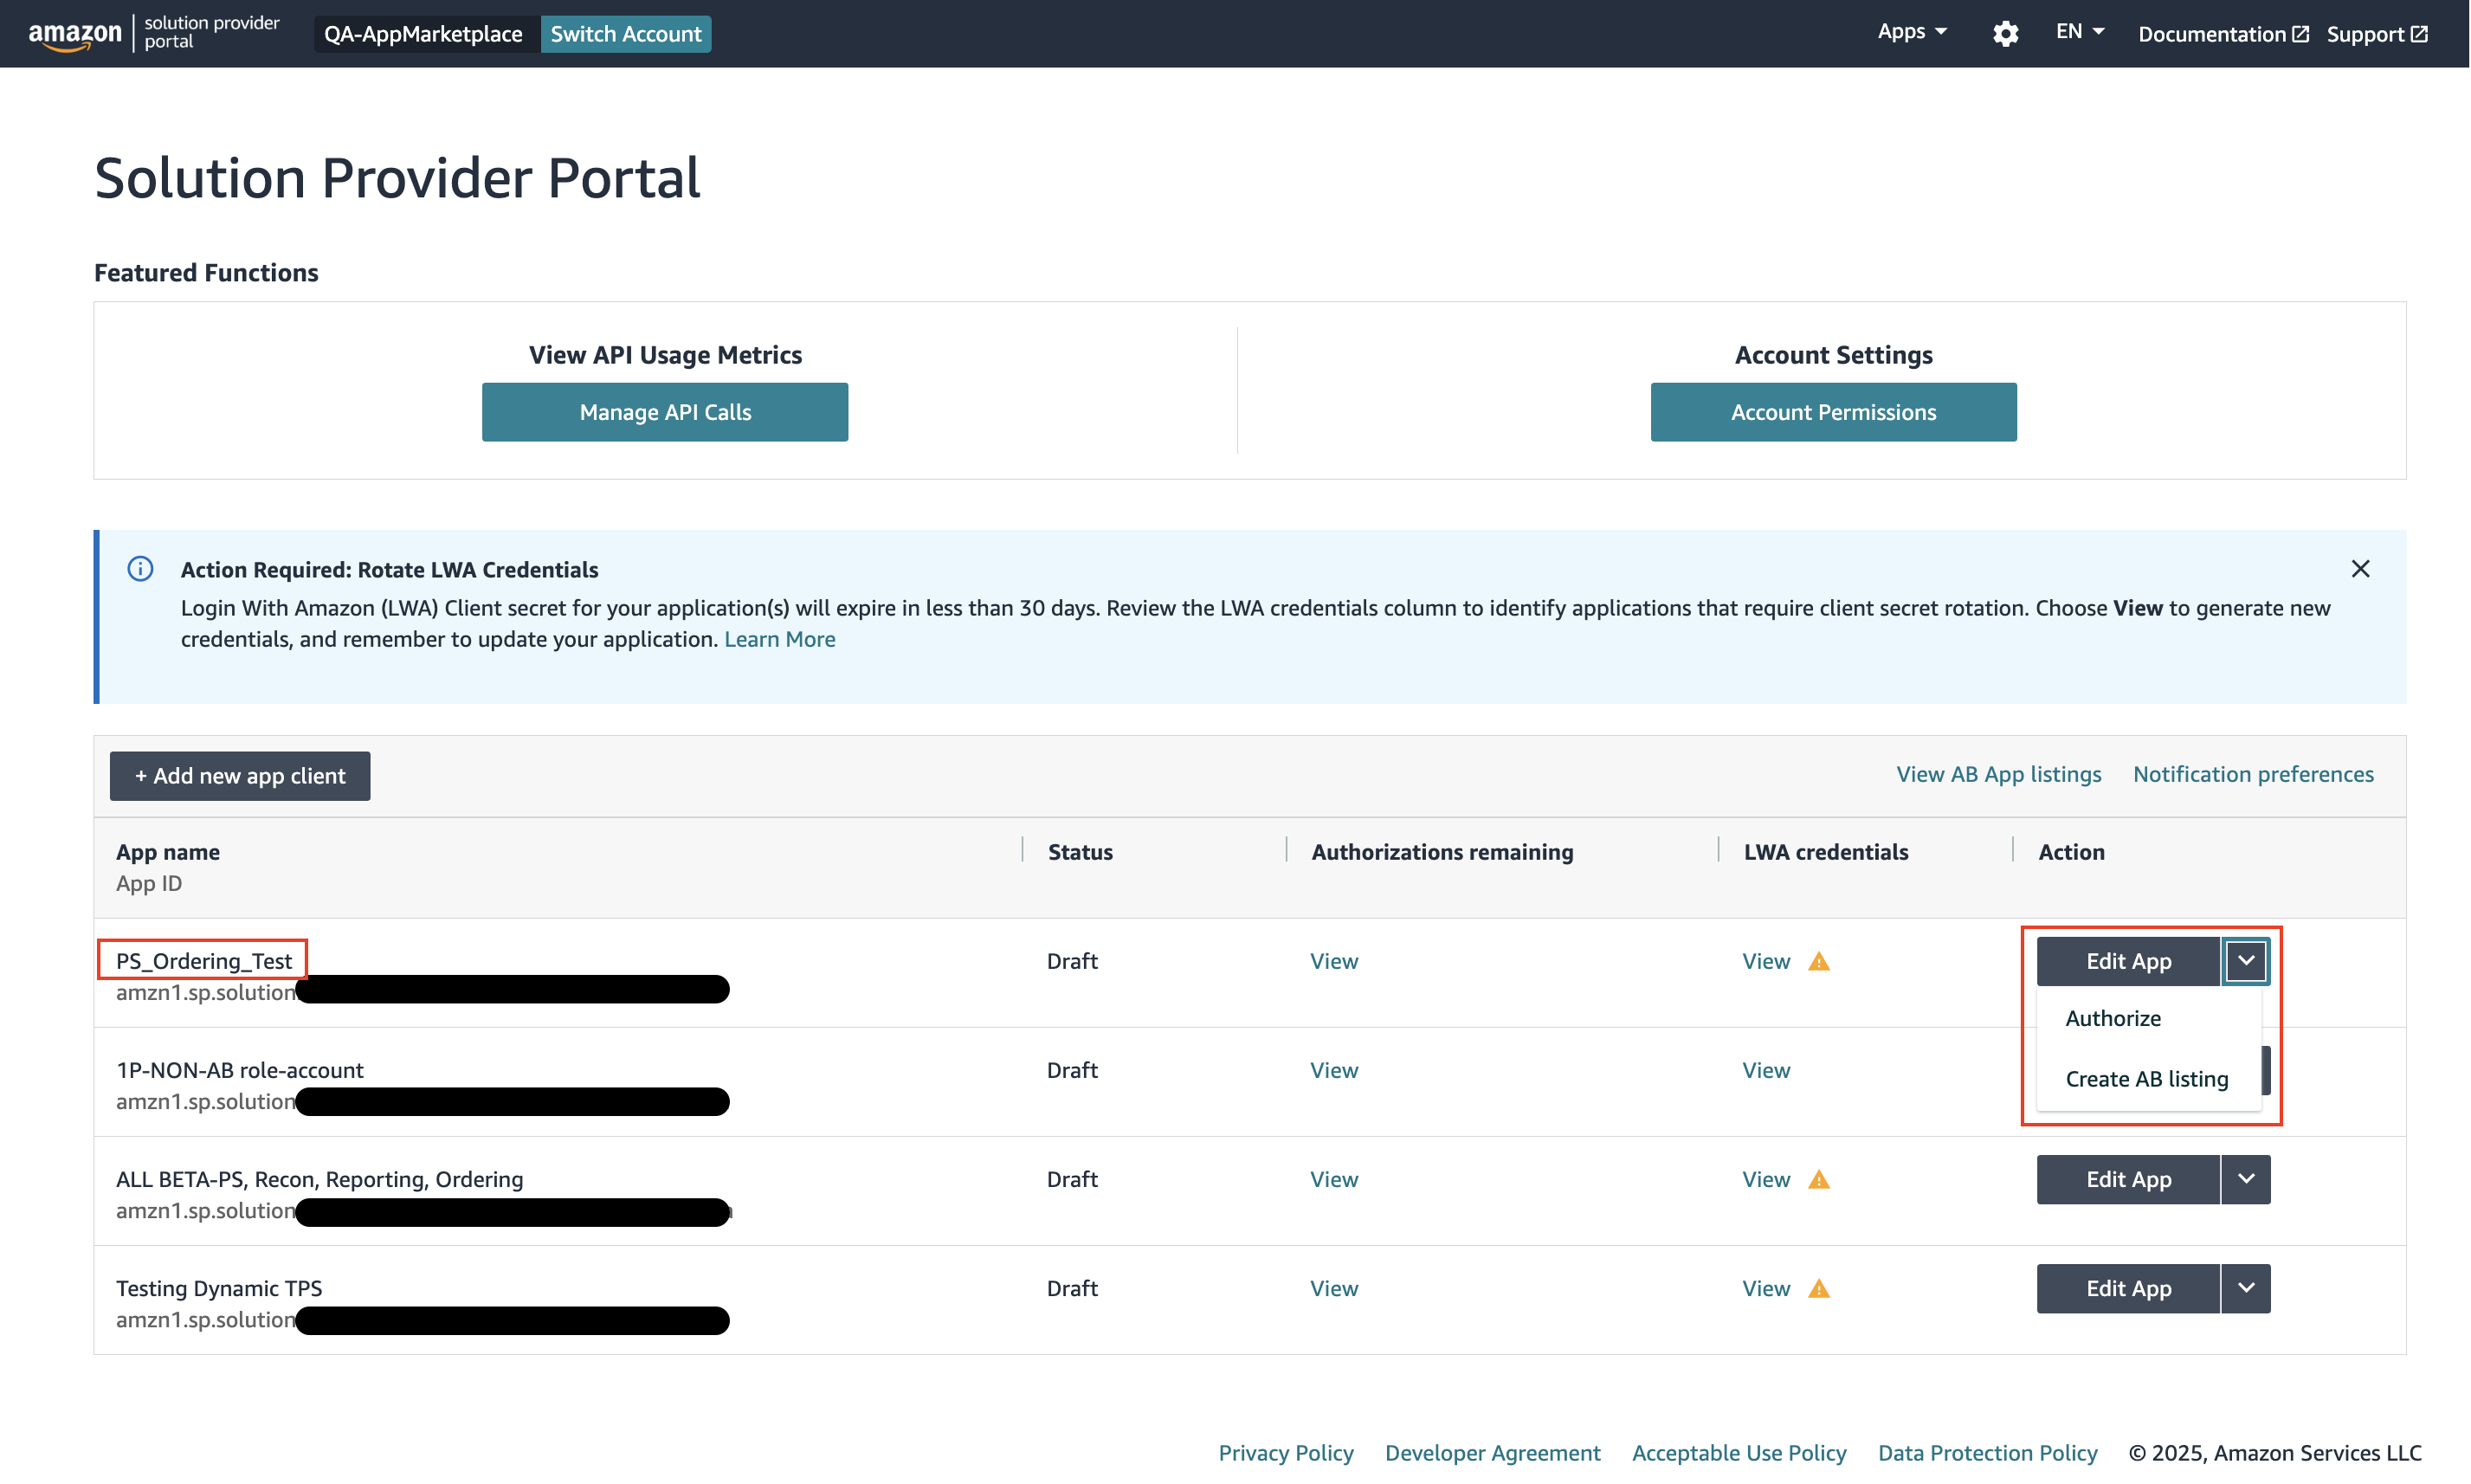
- Identify the app client for listing.
- In Action column, select Create AB listing from the list. The New App Submission form displays.
Create AB listing
The app listing process starts here. You have three sections to complete:
- App Information
- Media
- Compliance
The Listing Progress bar on the right indicates where you are in the process. You must complete each section before proceeding to the next.
To save a draft and resume where you left off at any point in the listing creation process, select Save draft at the bottom of the page.

Listing Progress: App Information
The information in the App Name, App ID, and App Listing Language fields automatically populates from the app client in SPP.
- Provide a display name in the input box. You have an option to use your app name as your app’s display name.
- Select the language for your app listing.
- Select the check box for your app category. You have an option to select multiple relevant categories.
| Category | Description |
|---|---|
| Accounting Management | Transfer purchase data between Amazon Business and your organization’s platforms. |
| Business Analytics | Get insights into your Amazon Business spending and procurement needs through analytics. |
| Expense Management | Manage your expenses and purchases on your Amazon Business account. |
| Rewards and Recognition | Automate employee rewards and other corporate gifting through Amazon Business. |
| Integrated Search and Punchout | Simplify the purchasing process and give your buyers easy access to Amazon Business. |
| User Management | Manage your users across multiple platforms from within your Amazon Business account. |
| Integrated Shopping | Customers purchase on Amazon Business without leaving their e-Procurement system. |
| Environmental, Social, and Governance (ESG) | Monitor and improve your environmental impact, social responsibility, and corporate governance practices. |
| Systems integration | Enable seamless integration between Amazon Business and your enterprise systems. |
| Intake & orchestration | Streamline procurement request intake, approvals, and orchestration across teams and systems. |
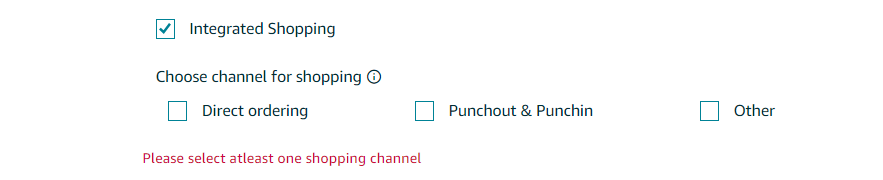
If you select Integrated Shopping, select one channel for shopping. Direct ordering places orders with Amazon Business electronically from your site. Punchout and Punch-in give buyers easy access to Amazon Business while complying with your procurement policies and controls.
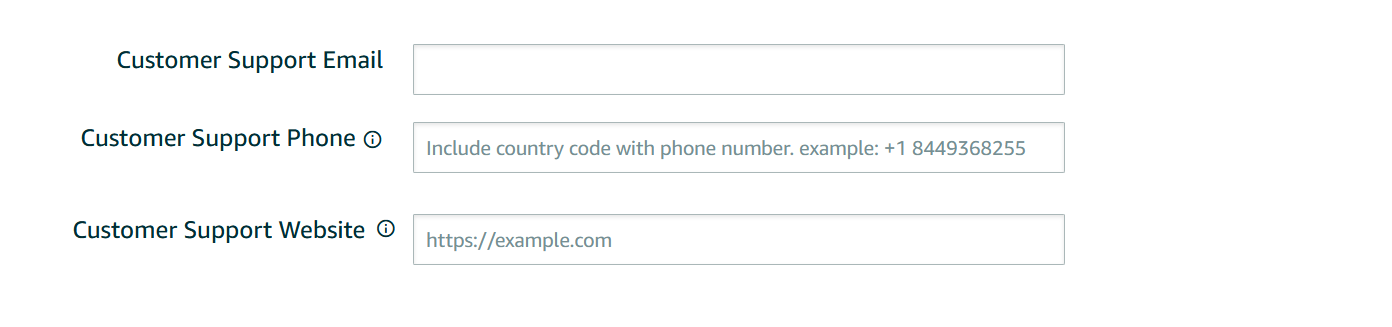
- Enter a customer support email, phone, and website in the text boxes. Your customers will refer to this information for technical support.
The phone number must include the regional country code, such as +1 for the US or +44 for the UK. Do not use any special characters such as spaces, dashes, or parentheses. For example: +12065550111.

- Select the country or countries where you would like your app to be available. Select a country only if you offer an integration in that country during your app’s initial launch. Otherwise, do not select that country.
Ensure all your app listing content is provided in each region's preferred language.

- By default, your app is for public view.

Unacceptable content
Note the following guidance regarding unacceptable content in app listings. Including any unacceptable content in your app listing will delay publication of your app.
- Do not include content that could offend a group of people based on their age, race, or other factors.
- Do not include sensitive content such as user credentials, customer quotes, and unpublished Amazon data.
- Do not list specific customer names, such as “Trusted by X Corporation.”
- Do not include personally identifiable information (PII) (such as a home address or phone number).
- Do not use any expressions or phrases such as "The best", "Number 1", and "The only.”
- Do not include functionalities or features that are against the Acceptable Use Policy (AUP), Data Protection Policy (DPP), and other Amazon policies. For example, a developer must not promote violation of any agreement between authorized users and Amazon, or statement that promotes workarounds to Amazon polices.
- Do not use any terms trademarked by Amazon, including AMZ. For more information, refer to Non-Exhaustive List of Amazon Trademarks.
In all listing content, use the term “Amazon Business” instead of “Amazon.”
- Provide a short and long description for your app. Both descriptions should be in paragraph format. Do not include bullet points in either description. The long description should specifically describe the benefits of your app’s integration with Amazon Business.
Sample Descriptions:
- Short Description: Report your Amazon Business spending with ACME Corp Inventory Management App.
- Long Description: ACME Corp Inventory Management App makes it easy to manage your inventory. With ACME Corp, you can effortlessly track your stock levels, replenishment, and purchase history, all from one intuitive interface. Search for products in the Amazon Business catalog, place orders directly in the app, and access purchasing data through a real-time dashboard. Get up and running in just a few clicks with our seamless Amazon Business integration.

- List the benefits of your app. Provide single-spaced bullets without any hyphens or dots preceding each bullet. List each benefit on a new line.
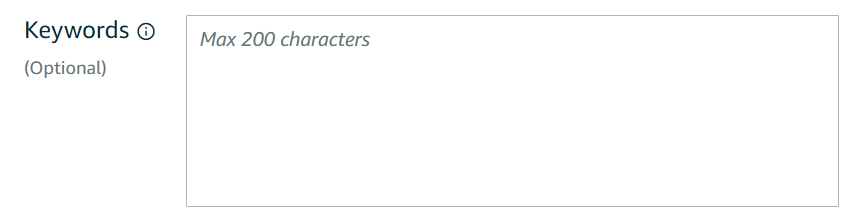
- Provide several keywords for your app. Keywords make it easy for Amazon Business customers to find your app. You can use a maximum of 200 characters for keywords. Separate each keyword with a comma (,). For example: Inventory Management, Product Sourcing, auto-replenishment

- Provide the URL for your end user license agreement. This URL must direct to a license agreement page and not to a generic landing page.
- Provide the URL for your privacy policy. This URL must direct to a privacy policy page and not to a generic landing page.

- Provide information, if you have any, in the optional technical requirements and disclaimers fields.

- In version number, indicate the version of your app integration. This is the version number that displays on the Amazon Business App Center for customers. Follow the semantic numbering specification. This is a three-digit numbering technique based on Major.Minor.Patch. For example: 4.2.2 For example: 4.2.2. Your first listing attempt should begin with 1.0.0.
- In version information, describe what is new in the version of your app integration.
- Select Next to continue. Go to Listing Progress: Media.
An error message appears if mandatory fields have no data.
Listing Progress: Media
The Media requires you to upload an icon and screenshots of your app. The acceptable image file extension is png. If the image file extension is in different format, save it in png before upload.
Note the following image guidance:
- App icons should be provided in SVG format, so that images can scale up and down without compromising image quality.
- App screenshots should be provided in a 4:3 ratio and in a compressed/web optimized format for load speed and storage purposes.
An error message appears when you change the file extension during upload.

Upload an app icon
- Select the image box (512 x 512 px png) on the right of the App Icon. This opens your local directory.
Upload screenshots
- Select the up arrow. This opens your local directory.

Consent
- Select the check box to consent to Amazon Business using your media for advertising or marketing purposes.
- Select Next to continue. Go to Listing Progress: Compliance.
Listing Progress: Compliance
The Compliance section requires you to confirm your compliance with Amazon Business standards for international app listings.

Select the check box to confirm your compliance. Select Save and Submit to complete your app listing submission. A confirmation message for your app listing submission displays on the page.
Preview your app listing
After you have provided all required fields in the new app submission form, you can preview your app listing. Preview mode allows you to see how your app listing will display once published and test the authorization workflow.
You can preview an app in DRAFT or SUBMITTED statuses.
To access preview mode, complete these steps:
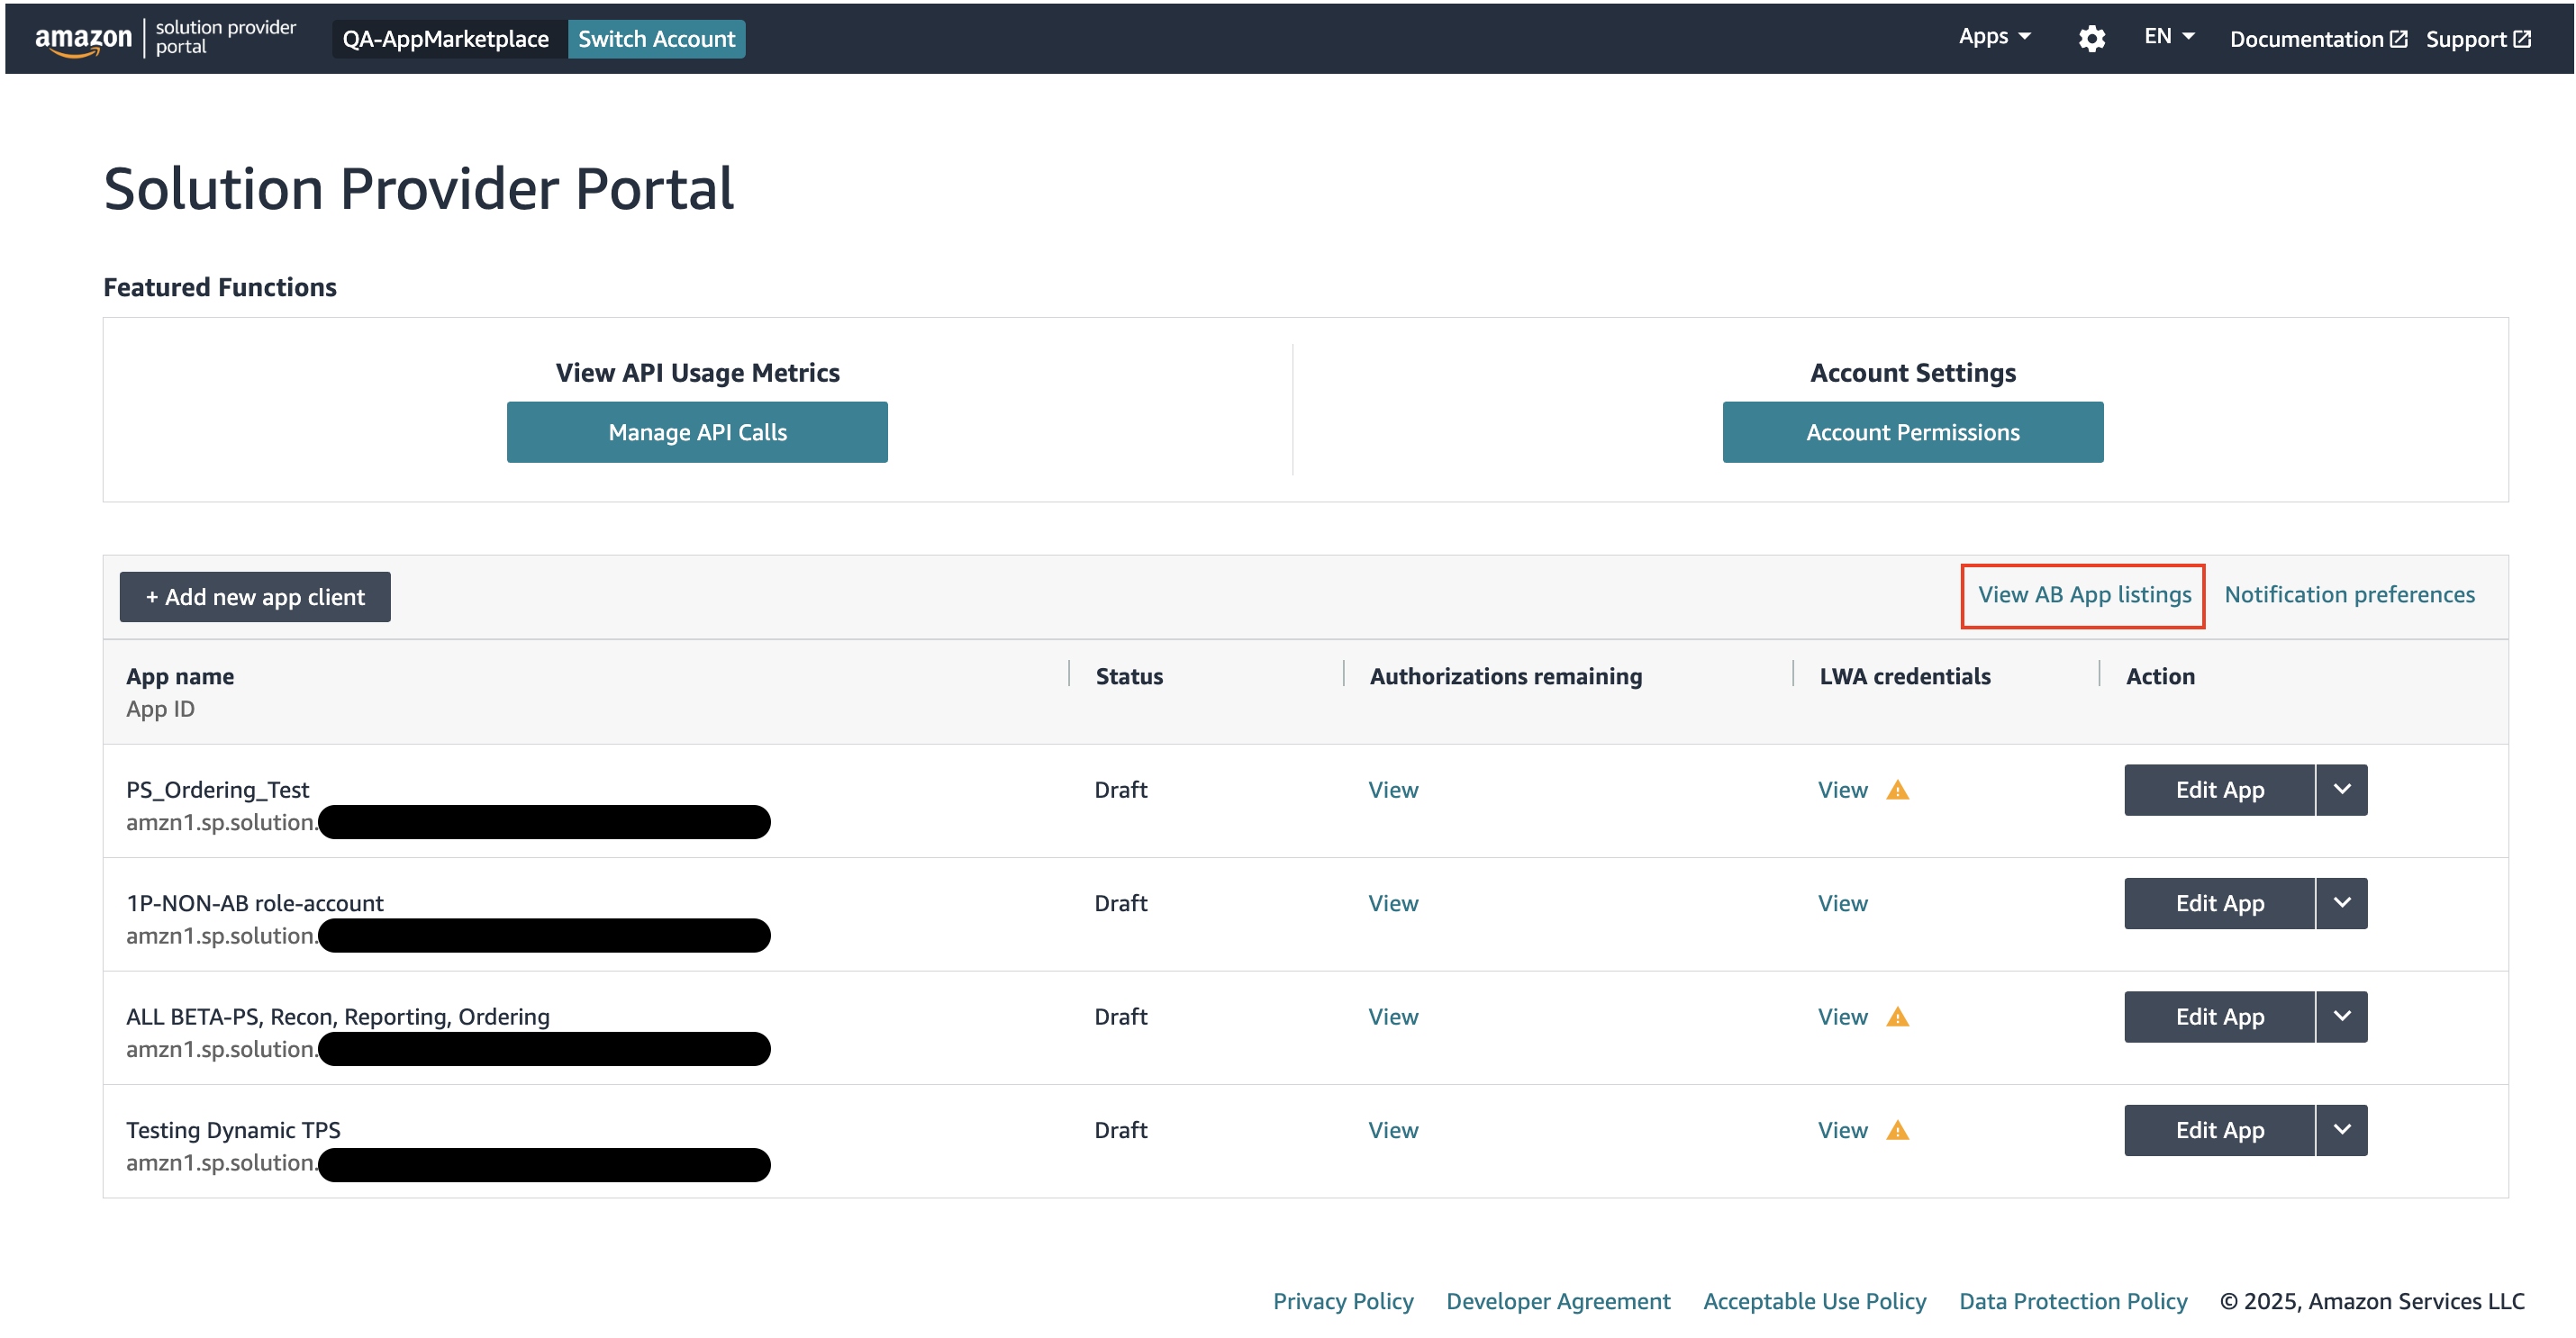
- In SPP, select View AB App listings.
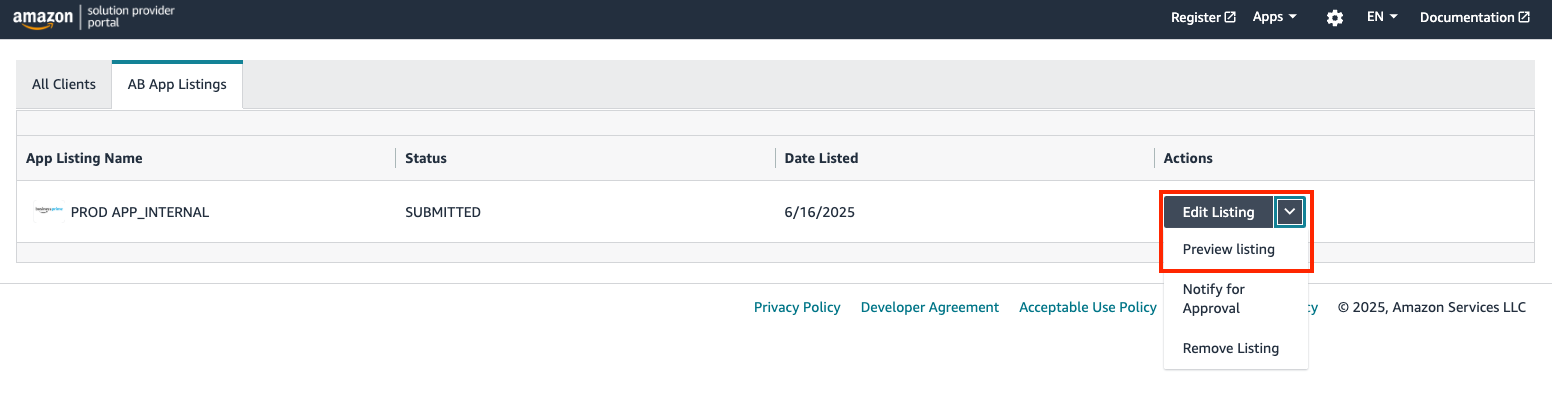
- Select the dropdown for the app you would like to preview.
- Select Preview listing.
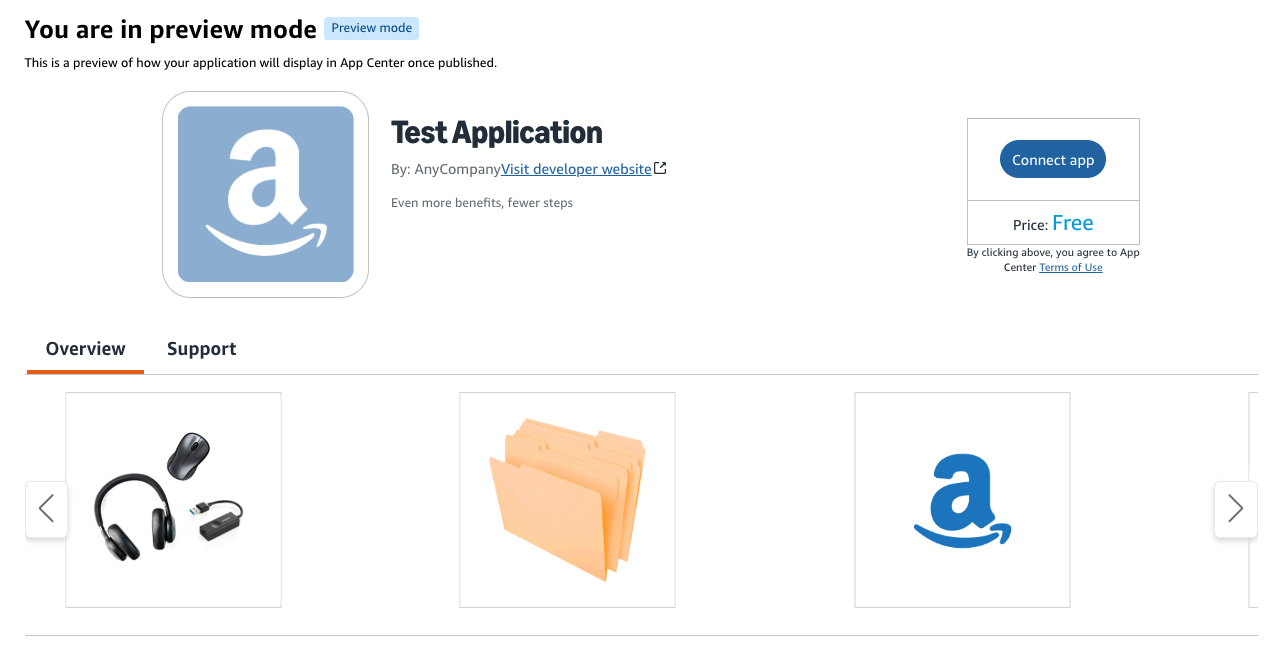
Preview mode displays. While in preview mode, you can verify that your listing content displays correctly, and test the App Center OAuth workflow using the Connect app button For more information about the authorization workflow, see App Center authorization workflow.
Based on your review of the app, you can take either of the following actions:
- If your app listing preview looks as expected, return to SPP. If the listing is in DRAFT status, select Edit listing, submit the listing, and select Notify for Approval. If the app is already submitted, select Notify for Approval. Selecting this option notifies the Amazon Business team to review your listing.
- If any changes are necessary, return to SPP and select Edit Listing. Make the required updates in the form, preview the listing again to verify the updates, and resubmit your listing.
Review
Your app listing request requires review by Amazon Business App Center team. While the review is ongoing, the status of your request shows in the SPP AB App Listings tab.

Listing status
App Center listings can have the following statuses:
| Status | Description |
|---|---|
| DRAFT | SPP saves your data automatically and marks the status as DRAFT. |
| SUBMITTED | The status shows SUBMITTED after you save and submit your app listing request. Expect an email from Amazon Business App Center team. |
| PUBLISHED | Your app is published and searchable by users. |
| DELETED | The status shows DELETED if you remove your submitted or draft app listing request before approval. |
| INACTIVE | Your app becomes INACTIVE if you remove your listing after approval or if Amazon Business review team finds your app non-compliant after approval. |
Recommendations
These recommendations speed up the app listing review process.
- Make your app functional, active, and ready for public view.
- Create a test environment.
- Test your app.
- Share your test environment and credentials with the Amazon Business App Center team. This provides opportunity for the team to run and test your app during the review process.
- Provide documentation that details the steps to test your app.
- Respond to emails from the Amazon Business review team.
- Keep your Amazon Business developer account contact info up-to-date.
Frequently asked questions
Q: What should I expect during the review?
A: Amazon Business App Center team assesses the quality and functionality of your app. If any updates to your app listing content are required, the Amazon Business App Center team will share feedback with you via email. If necessary, the App Center team can also schedule a meeting to discuss the necessary revisions.
Q: What is the average estimated time to complete the review?
A: Your immediate response to the team’s request determines the timing for review completion, app listing approval, and publication.
Q: How do I edit an app listing?
A: To edit an app listing after it is submitted or published, see Manage your app listing.
Updated 2 months ago